In summary:
- Your phone or tablet can be a complete, professional podcast production studio.
- Mastering a minimalist, laptop-free workflow is key to producing high-quality content on the move.
- Success depends on choosing the right mobile apps, “hacking” your environment for better acoustics, and using smart recording techniques.
- From recording to publishing, every step can now be managed entirely from your mobile device.
The image of a podcaster is often one of a dedicated studio, professional microphones, and complex mixing desks. For a journalist on the move, this setup is a logistical nightmare. The constant pressure to produce timely audio stories clashes with the reality of being far from a controlled recording environment. You have the story, you have the sources, but you’re stuck in a hotel room with just your phone, feeling like professional quality is out of reach. This is the core frustration for any nomadic creator.
Many guides will give you the generic advice: “get a good mic,” “find a quiet place.” They treat mobile podcasting as a compromised, amateur version of the real thing. But what if this perspective is outdated? What if the constraints of mobility are not a weakness, but a creative advantage? The secret isn’t about trying to replicate a studio on the road. It’s about embracing a completely different, tech-savvy, and minimalist workflow that is native to the mobile experience.
This guide reframes the entire process. We will explore how to transform your phone or tablet into a powerful production hub. Forget compromise; we’re aiming for a seamless, laptop-free pipeline that delivers broadcast-quality audio from anywhere. This article will walk you through the essential software choices, acoustic “hacks” for imperfect locations, advanced recording techniques, and the final steps to publish your work, all without ever opening a laptop. It’s time to master the art of nomadic podcasting.
This article provides a complete roadmap for the modern mobile journalist. Below, you’ll find a detailed breakdown of each step in the process, from choosing your editing software to building your audience.
Summary: Your Complete Mobile Podcasting Workflow
- Ferrite or GarageBand: Which App Turns Your iPad into a Mixing Desk?
- How to Record Studio-Quality Voiceovers in a Hotel Room?
- The Best USB-C Microphones for Android Phones in 2024
- How to Upload and Publish Your Episode Without Touching a Laptop?
- The “Walk and Talk” Technique: Recording Dynamic Interviews in Motion
- Live Stream or Podcast: Which Format Builds an Audience Faster?
- Lavalier or Shotgun Mic: Which One to Plug into Your Phone for Interviews?
- How to Build a Loyal Audience Using Community Management Strategies?
Ferrite or GarageBand: Which App Turns Your iPad into a Mixing Desk?
The core of your laptop-free pipeline isn’t hardware; it’s the software that transforms your tablet into a Digital Audio Workstation (DAW). For iOS users, the choice often boils down to two powerhouses: Apple’s free GarageBand and the purpose-built Ferrite Recording Studio. While GarageBand is an excellent, accessible starting point, a professional workflow demands more specialized tools. This is where the minimalist philosophy becomes critical: choosing the tool that does the job most efficiently.
GarageBand provides basic multi-track recording and editing, which is sufficient for simple projects. However, for a journalist on a deadline, features that automate tedious tasks are invaluable. Ferrite is designed for this. Its ability to automatically strip silence, for instance, can save significant time in editing an interview. Furthermore, it supports industry loudness standards like -14 LUFS, ensuring your podcast sounds professional and consistent across all platforms without manual guesswork. While it comes at a cost, the investment translates directly into workflow efficiency.
The decision depends on your commitment to a truly mobile workflow. GarageBand is the versatile multi-tool, but Ferrite is the specialized scalpel. For nomadic podcasters who value speed and professional output, Ferrite’s focused feature set often justifies the price. The following comparison highlights the key differences for a professional on the move.
This decision is further informed by a feature-by-feature breakdown, as detailed in this mobile podcasting app comparison.
| Feature | Ferrite | GarageBand |
|---|---|---|
| Multi-track Recording | Up to 32 tracks | Up to 8 tracks |
| Strip Silence | Advanced automation | Basic manual |
| Price | $19.99 Pro version | Free |
| Cloud Sync | iCloud & Dropbox | iCloud only |
| Loudness Standards | -14 LUFS support | Manual adjustment |
How to Record Studio-Quality Voiceovers in a Hotel Room?
The biggest challenge for a nomadic podcaster isn’t the microphone; it’s the room. A hotel room, with its hard, flat surfaces, is an acoustic nightmare, creating echo and reverb that scream “amateur.” The key isn’t to find a perfect space but to engage in “acoustic hacking”—using your environment to create a makeshift vocal booth. This is constraint-driven creativity in its purest form. Forget expensive sound panels; your best tools are already in the room.
Your goal is to minimize sound reflections. Start by identifying the noisiest part of the room, usually the window facing the street or the door to the hallway. Position yourself as far away as possible, facing into the quietest corner. The hum of the mini-fridge or air conditioner can be a persistent issue; unplug them during recording. Your primary weapons against reverb are soft, dense materials. The pillows and duvet on the bed are your new best friends. Build a small fort of pillows around your microphone to absorb sound waves before they can bounce off nearby walls.
Drape the heavy duvet or blankets over a chair behind you to create a “sound blanket” that absorbs reflections from the wall you’re facing. Clothes in your open suitcase can act as impromptu bass traps when placed in corners. The goal is to create a “dead” space immediately around your microphone, where your voice is captured cleanly without room tone. It may look absurd, but the audio results speak for themselves.
As you can see, this approach transforms everyday objects into professional acoustic treatment. This setup ensures that your voice is the dominant sound source, free from the distracting echo that would otherwise compromise the recording. This is the essence of a mobile-first mindset: adapting and innovating with what you have.
Your Action Plan: Hotel Room Acoustic Hacking
- Build a pillow fort using hotel pillows as absorption panels around your recording area.
- Hang the duvet behind you as a sound blanket to reduce reflections.
- Place your open suitcase in corners to act as bass traps.
- Position dense coats on walls to dampen additional reflections.
- Consider using a parked rental car as an alternative recording space for superior acoustics.
The Best USB-C Microphones for Android Phones in 2024
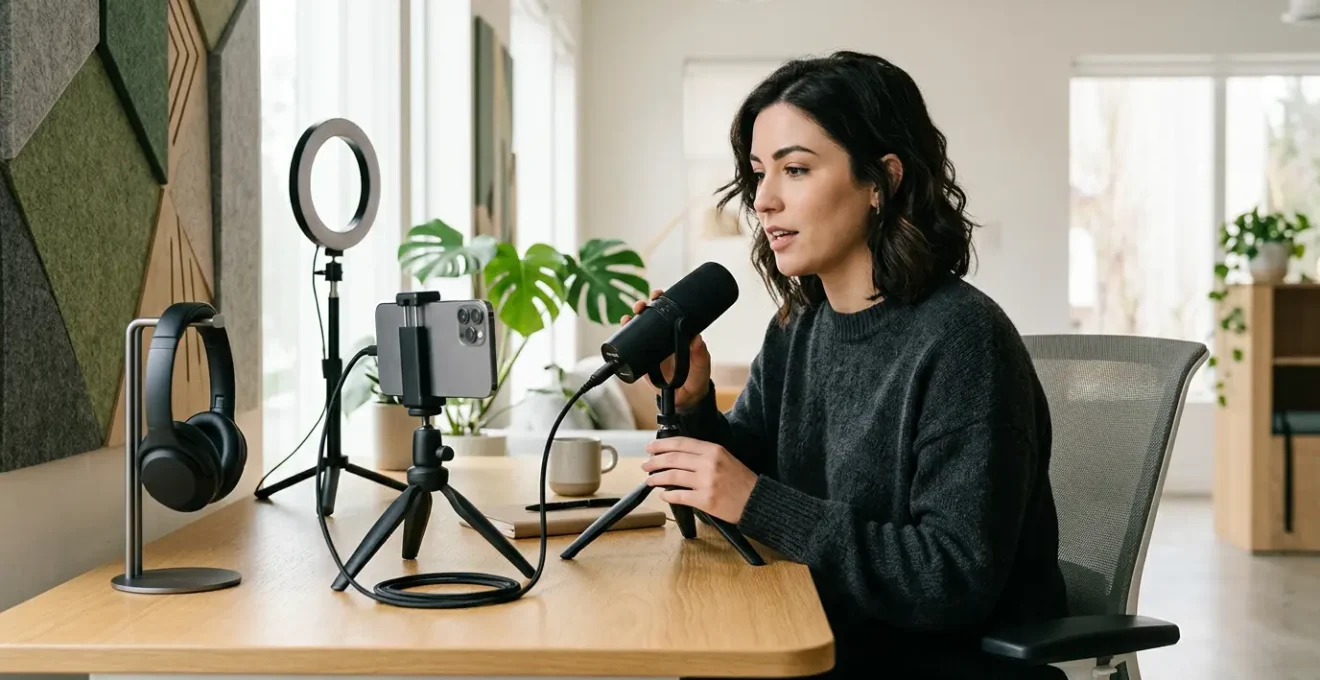
While the iPhone has a mature ecosystem of Lightning accessories, the world of USB-C for Android has exploded with high-quality, plug-and-play microphones perfect for the mobile journalist. Choosing the right one is crucial. Your phone’s internal microphone is designed for calls, not for capturing the rich, nuanced audio required for a podcast. A dedicated external microphone is the single most important hardware upgrade you can make. With the knowledge that over 70% of weekly podcast listeners use mobile phones, delivering clean audio is non-negotiable.
For solo narration or voiceovers, a compact condenser USB-C microphone is ideal. Models like the Rode NT-USB+ or the Shure MV7 (with a USB-C cable) offer broadcast-quality sound in a portable package. They connect directly to your phone and are powered by it, adhering to the minimalist workflow. Their cardioid pickup pattern is excellent at isolating your voice and rejecting sound from the sides and rear, which is a huge advantage when you’re recording in less-than-ideal locations.
When selecting a mic, look for features that simplify your mobile workflow. A built-in headphone jack for zero-latency monitoring is essential. This allows you to hear exactly what the microphone is capturing in real-time, without any delay, which is critical for checking your levels and position. Also, consider microphones that come with their own dedicated app, which can give you more control over gain, pickup patterns, and other settings directly from your phone. This eliminates the need to fiddle with settings in your main recording app, further streamlining the process.
How to Upload and Publish Your Episode Without Touching a Laptop?
The final hurdle in a truly laptop-free pipeline is publishing. You’ve recorded and edited your masterpiece on your tablet; the last thing you want is to be forced to find a computer just to upload the file. Fortunately, the modern podcasting ecosystem is fully mobile-friendly. Your podcast host—the service that stores your audio files and generates your RSS feed—is the key. Most major hosts now offer robust mobile websites or dedicated apps.
The process is straightforward. After exporting your final MP3 or WAV file from an app like Ferrite, you save it to your device’s local storage or a cloud service like Dropbox or iCloud Drive. Then, simply open your podcast host’s website in your mobile browser (or launch their app). Services like Libsyn, Buzzsprout, or Transistor.fm have mobile interfaces that allow you to access the full upload functionality. You can create a new episode, upload your audio file directly from your phone, write your show notes, set your title, and hit “publish.”
This final step closes the loop on the minimalist workflow. The ability to go from concept to published episode entirely on one device is not just a novelty; it’s a powerful advantage for a journalist covering breaking news or producing content with a quick turnaround. As the global podcasting market is projected to reach $131.13 billion by 2030, mastering this efficient, mobile-first publishing process gives you a competitive edge, allowing you to be more agile and responsive than creators tied to a desktop setup.
The “Walk and Talk” Technique: Recording Dynamic Interviews in Motion
Static, sit-down interviews can often feel stiff and unnatural. The mobile podcaster can turn this constraint into a strength by embracing the “walk and talk” technique. Recording an interview while walking with your subject introduces a level of energy and dynamism that is impossible to replicate in a studio. The shared experience of moving through a space often makes guests more relaxed and conversational, leading to more authentic and engaging content. This is dynamic storytelling in action.
Executing this technique requires a specific yet minimal setup. The ideal choice is a pair of wireless lavalier microphones, one for you and one for your guest, connected to a dual-channel receiver plugged into your phone. This ensures that both voices are captured cleanly on separate audio channels, giving you full control in post-production. It’s crucial to use high-quality windscreens (often called “deadcats”) on each microphone to eliminate wind noise, which is the biggest enemy of outdoor recording.
The key to a successful walk and talk is to let the environment become a third character in the story, but not a distracting one. Walk at a steady, relaxed pace to avoid heavy breathing being picked up by the mics. If you’re walking past a particularly noisy area, like a construction site, either pause the recording or acknowledge the sound as part of the narrative (“As we’re walking past the old market…”). This technique transforms a simple interview into an immersive audio experience, placing the listener right there with you and your guest.
This method leverages your mobility, turning a potential disadvantage—the lack of a quiet, controlled space—into a unique narrative tool that sets your podcast apart. It’s a prime example of how a mobile-first approach can lead to more compelling creative outcomes.
Live Stream or Podcast: Which Format Builds an Audience Faster?
As a mobile creator, you have two primary avenues for your content: pre-recorded podcasts or live streams. Each format has distinct advantages for audience building, and the right choice depends on your goals and content style. Live streaming offers immediacy and direct interaction. Viewers can engage with you in real-time through comments and Q&A, creating a strong sense of community from day one. This instant feedback loop can be powerful for building a core group of dedicated followers quickly.
However, live streaming is ephemeral. Its value peaks during the live broadcast and drops off sharply afterward. It also demands a stable, high-speed internet connection, which can be a significant challenge for a nomadic creator. A pre-recorded podcast, on the other hand, builds value over time. Each episode becomes an evergreen asset that new listeners can discover weeks, months, or even years later. This creates a long tail of discoverability that is crucial for sustained audience growth. Moreover, studies show that video podcast formats can be 50-70% more engaging than audio-only, a benefit that can be leveraged in both live and pre-recorded formats, but which has a longer shelf-life in a podcast.
For the mobile journalist, the podcast format is often more reliable and strategic. It isn’t dependent on unpredictable Wi-Fi and allows for a more polished final product. While audience growth may feel more gradual than the instant rush of a live stream, it is often more sustainable. The best strategy can be a hybrid one: use live streams for special events or Q&A sessions, but focus on the evergreen podcast as your primary engine for audience growth.
The choice between these formats impacts everything from engagement speed to monetization, as shown in this breakdown of audience-building factors.
| Factor | Live Streaming | Podcast |
|---|---|---|
| Engagement Speed | Immediate (live Q&A) | Gradual (async comments) |
| Content Longevity | Short-term peaks | Evergreen value |
| Mobile Stability | Connection dependent | Reliable recording |
| Monetization | Super Chats, live donations | Programmatic ads, sponsors |
Lavalier or Shotgun Mic: Which One to Plug into Your Phone for Interviews?
When conducting interviews with your phone, your microphone choice will define the audio quality. The two most common options for mobile journalists are lavalier (or “lav”) mics and mini-shotgun mics. They are not interchangeable; each excels in a different scenario, and a true tech-savvy podcaster knows when to use which. The decision hinges on one factor: control over your environment and subject.
A lavalier microphone is a small mic that clips directly onto your subject’s clothing. Its greatest strength is proximity. By being just inches from the speaker’s mouth, it captures their voice directly and rejects a significant amount of background noise. This makes it the perfect choice for sit-down interviews in moderately noisy environments, like a café or an office. It ensures your guest’s voice is always clear and upfront. For a two-person interview, a dual-lavalier system that plugs into a single phone input is the gold standard for mobile setups.
A mini-shotgun microphone, which mounts onto your phone or a small grip, offers a different kind of flexibility. It has a highly directional (cardioid or supercardioid) pickup pattern, meaning it primarily captures sound from where it’s pointed and rejects sound from the sides. This makes it ideal for “run and gun” situations where you don’t have time to mic someone up, or for capturing ambient sound that adds context to your story. It’s also more discreet. Pointing a phone with a shotgun mic at someone is often less intimidating than clipping a device to their shirt.
Key takeaways
- Mastering a laptop-free workflow is about efficiency and creativity, not compromise.
- “Acoustic hacking” your environment with simple items like pillows and blankets is the most critical skill for clean audio on the road.
- The right combination of a dedicated mobile app (like Ferrite) and a purpose-built microphone (lavalier or shotgun) forms the core of your mobile studio.
How to Build a Loyal Audience Using Community Management Strategies?
Creating great content is only half the battle. For a podcast to succeed in the long term, it needs a loyal, engaged community. For the nomadic podcaster, community management must be as mobile and efficient as the production process itself. This isn’t about spending hours on social media; it’s about executing a minimalist, high-impact playbook directly from your phone. The goal is to make your listeners feel seen and heard, transforming them from passive consumers into active advocates.
Your community lives where your listeners are. This might be in the comments section of your podcast platform, on a dedicated Discord or Slack server, or on social media channels like Instagram or Twitter. The key is to be present and responsive. Dedicate small, focused blocks of time each day to interact. A simple five-minute daily routine can make a huge difference: respond to a few comments, ask an engaging question, or share a behind-the-scenes photo from your current location. This consistency signals that there’s a real person behind the microphone who values their audience.
Leverage your mobility as a content advantage. Share voice memos or short video clips from the field, giving your community a glimpse into your reporting process. This raw, unpolished content builds authenticity and connection. Use mobile apps to schedule posts or polls, ensuring your community stays engaged even when you’re busy. By integrating these small, consistent actions into your daily routine, you can build a thriving community from anywhere in the world, using the same device you use to create your show.
By mastering this mobile-first workflow, you are not just creating a podcast; you are building a nimble, modern media operation. The next logical step is to start implementing these strategies and choose the gear and apps that best fit your specific needs on the road. Begin with one piece of the puzzle—perhaps mastering acoustic treatment in your next hotel stay—and build from there.
Frequently Asked Questions on How to Launch a Professional Podcast Using Only Mobile Equipment?
When should I use a lavalier microphone with my phone?
Use a lavalier when you have control over the environment and can properly mic up your subject. They excel at isolating voice and rejecting background noise.
What advantages do shotgun mics offer for mobile recording?
Shotgun mics are ideal when you need to be discreet, capture ambient sound, or have no time to set up. Their cardioid pattern rejects side noise effectively.
Can I use both mic types simultaneously?
Yes, the hybrid ‘interviewer-shotgun, guest-lav’ setup using a splitter cable or dual-channel receiver provides maximum flexibility in post-production.